
From Sunday, July 28 to Saturday, August 3 I spent time at the Crow Canyon Archaeological Center near Cortez, Colorado. The main objective, while I was at Crow Canyon, was to help answer some questions relating to human/environmental relationships in Southwest Colorado, the social structure of the Ancestral Puebloans, community centers and public architecture, and identity formulation in relation to Chaco (a place that was occupied by Native Americans in New Mexico and is thought to have connections to many places in the Southwestern part of Colorado and the Southwest of the United States as a whole). While I was there I learned about the history and analyzed artifacts from the Ancestral Puebloans time in Southwest Colorado. Even though I spent only 6 days at Crow Canyon I learned more about the Ancestral Puebloans in that time than I did in over 12 years of school.
Shortly after I arrived at Crow Canyon on July 28th, Kari, one of the lab directors, gave us a short tour of Crow Canyon and then to the Mesa Verde room to have a short introduction to Crow Canyon. In the introduction, Kari told us that Crow Canyon’s mission statement was to advance and share knowledge of the human experience through archaeological research, education programs, and partnership with American Indians. Also during the introduction, I learned that excavation is a destructive science because once a site is excavated you cannot put the found artifacts and soil back exactly the way it was found. Many archaeologists believe that the disturbance of the preserved piece of history is worth the knowledge that is gained from it.
The first part of July 29th was spent learning about the different time periods of the people that lived in the area. The 6 main Puebloen time periods that occurred in the area include the Archaic 5500 BCE-500 BCE, Basketmaker 500 BCE-750 CE, Pueblo I (PI) 750 CE-900CE, Pueblo II (PII) 900 CE-1150 CE, and Pueblo III (PIII) 1150 CE- 1300 CE. The second half of the day was spent learning of the four different artifacts that the excavations at Crow Canyon are likely to be found. The most common artifact found at excavation sites is chipped stones. Chipped stones can be separated into 4 categories: cores, flakes, modified flakes, and chipped stone tools. Cores are the stones that are hit with another stone or tool to break off flakes. To identify a core you can look for the stone to have one or more flake scars (indentions) where flakes were removed. Flakes are the small pieces of stone removed from the core. Flakes have ridges on their outer surface and a bulb of percussion on the inside surface. Often those flakes are turned into modified flakes. Modified flakes are simple flake tools with one or more modified edge with at least 3 small flakes removed. Due to modified flakes being extremely sharp they are used to cut. Other flakes from the core are turned into chipped stone tools. Chipped stone tools are more common tools for modified flakes and they have more flake scars where flakes were removed to give them shape and sharpened edges. Chipped stone tools include projectile point (ex. arrowhead, knives, spearheads, etc.), bifaces ( chipped stone tool where both sides are sharpened), and drills. Another common artifact found are ground stone artifacts. Ground stone artifacts were used to grind other stones or food. Common forms of ground stone artifacts include Manos and Metates (which are used for grinding corn or other hard foods), pecking stone (used for re-ruffian the surface of a grinding stone to help it grind better), and abraders (used for grinding other stones into a specific shape). Another common artifact found is pottery sherds, not shards because shards are made of glass. I learned the two different types of pottery are grey wares and white wares. Grey wares ware has no-slip (a thin layer of pure clay applied to the visible surface of pottery), polish (a smooth, often shiny, surface on the pottery vessel), or paint (a pigment applied to the visible surface on the pottery) and almost always jars. Grey wares can be further separated into three forms plain, corrugated (pictured below), and neckbanded (pictured below). Corrugated pottery surface 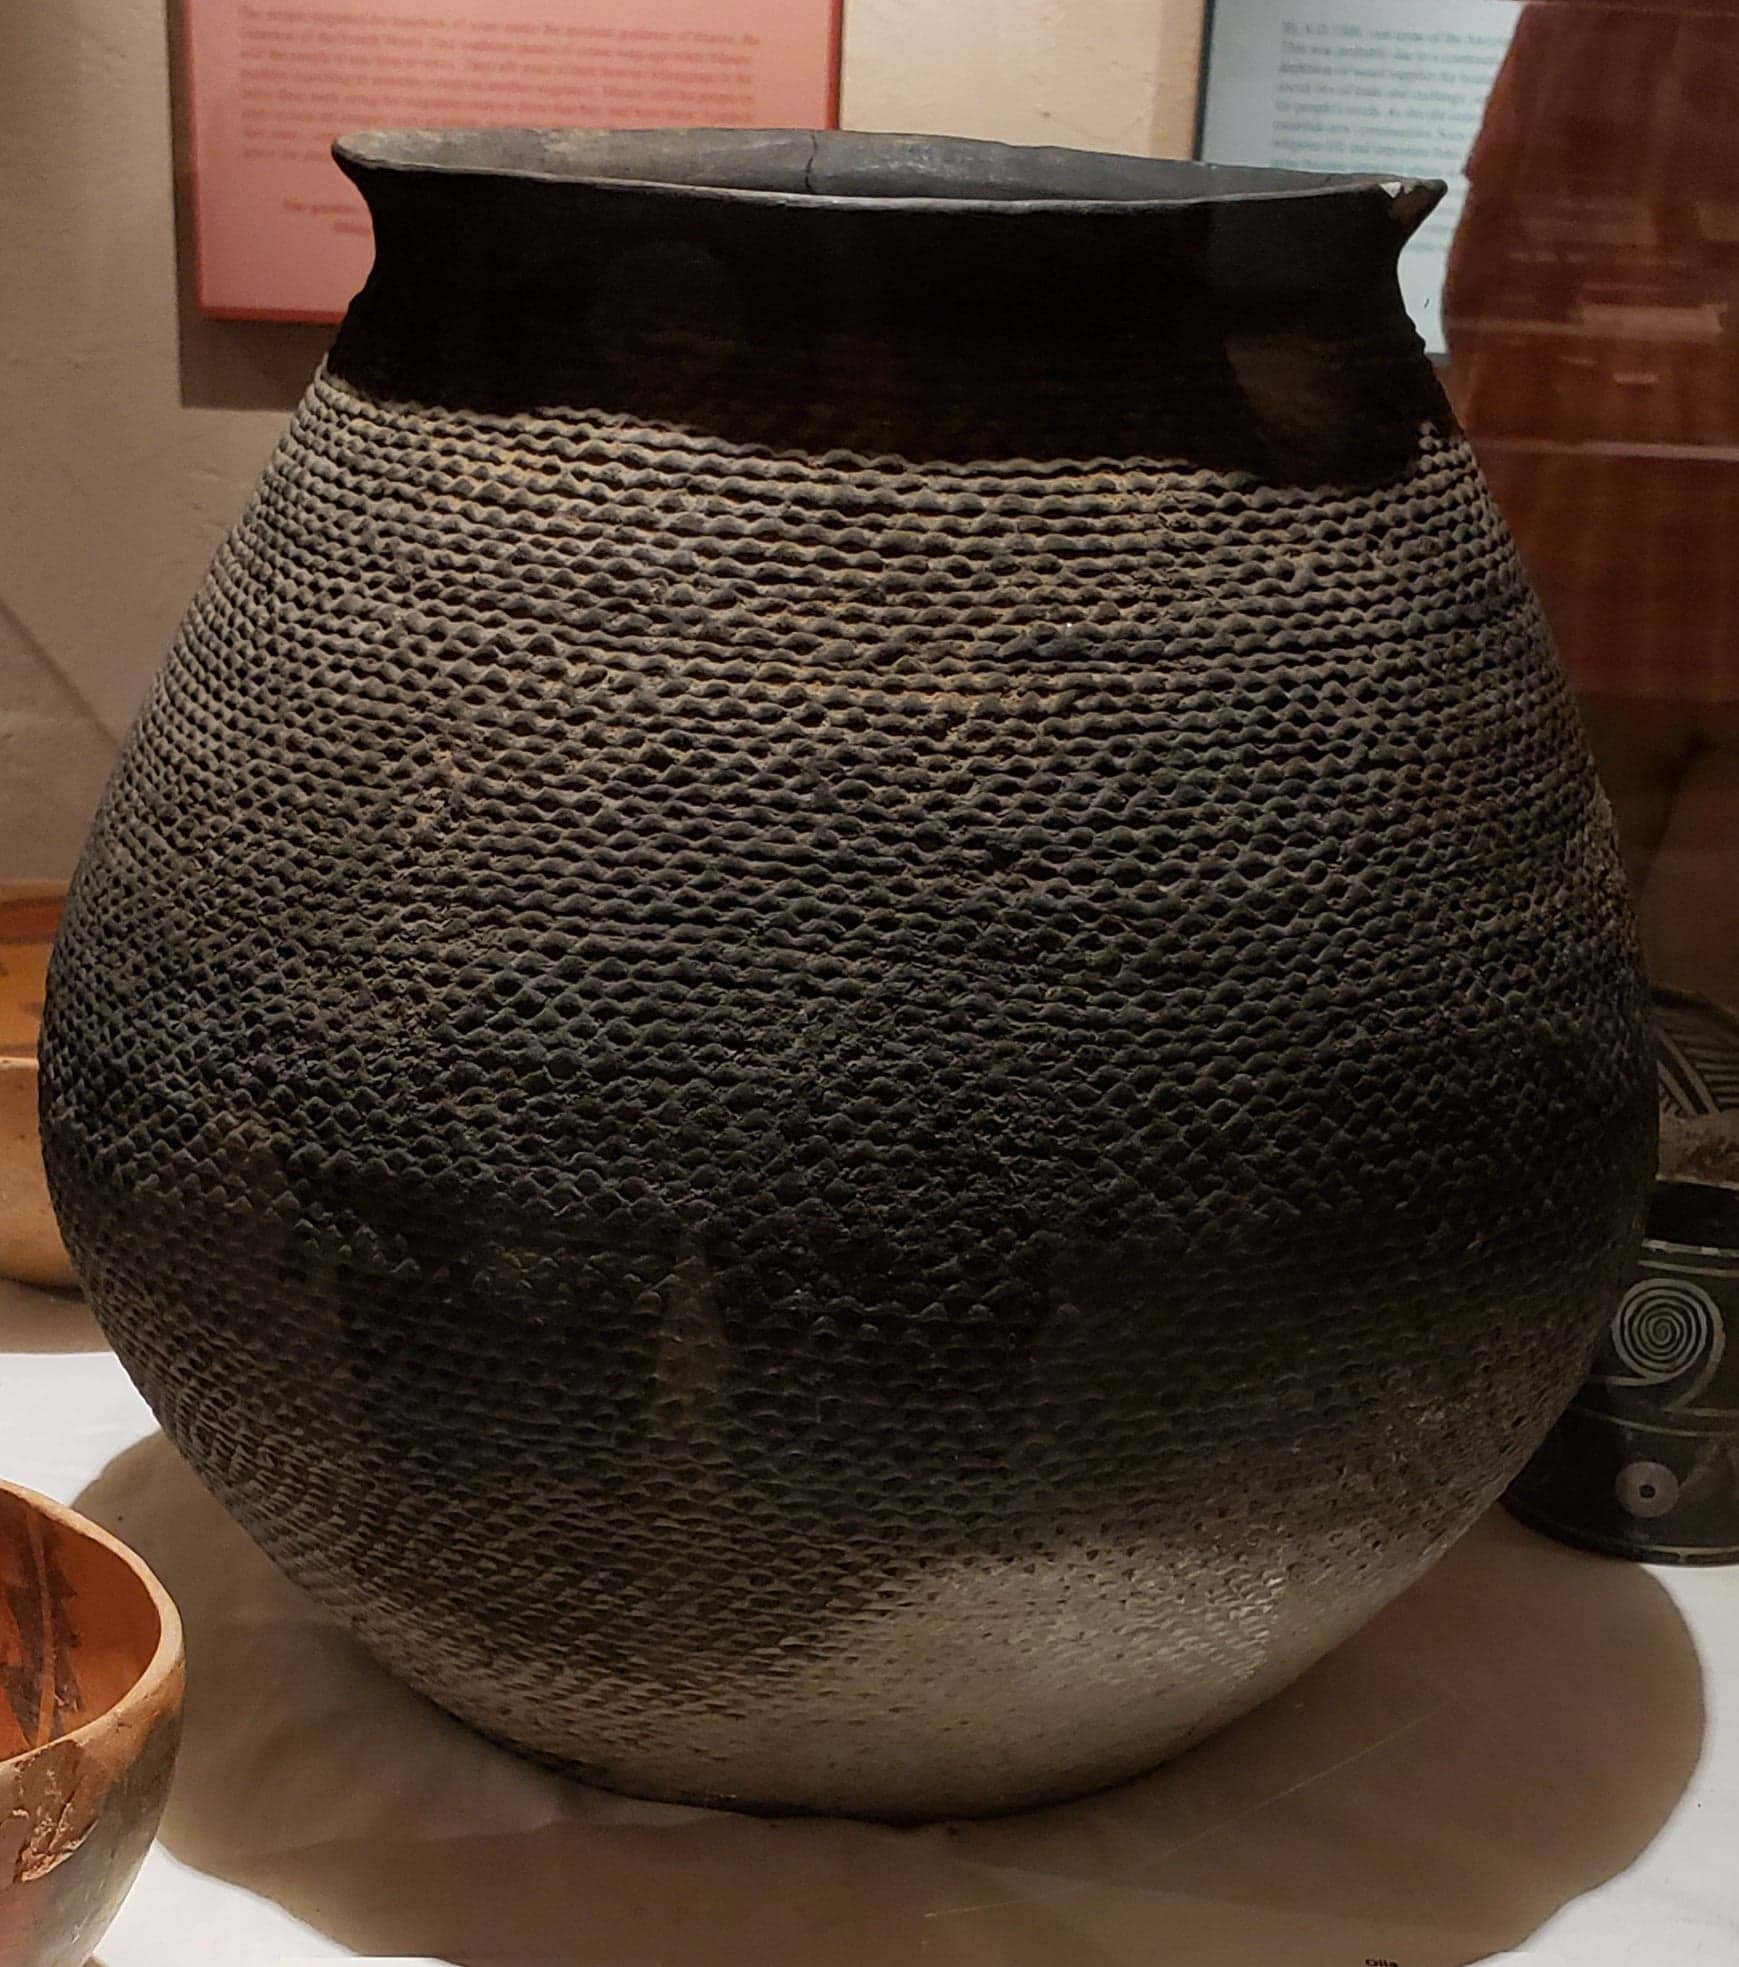 is made by the potter pressing their finger
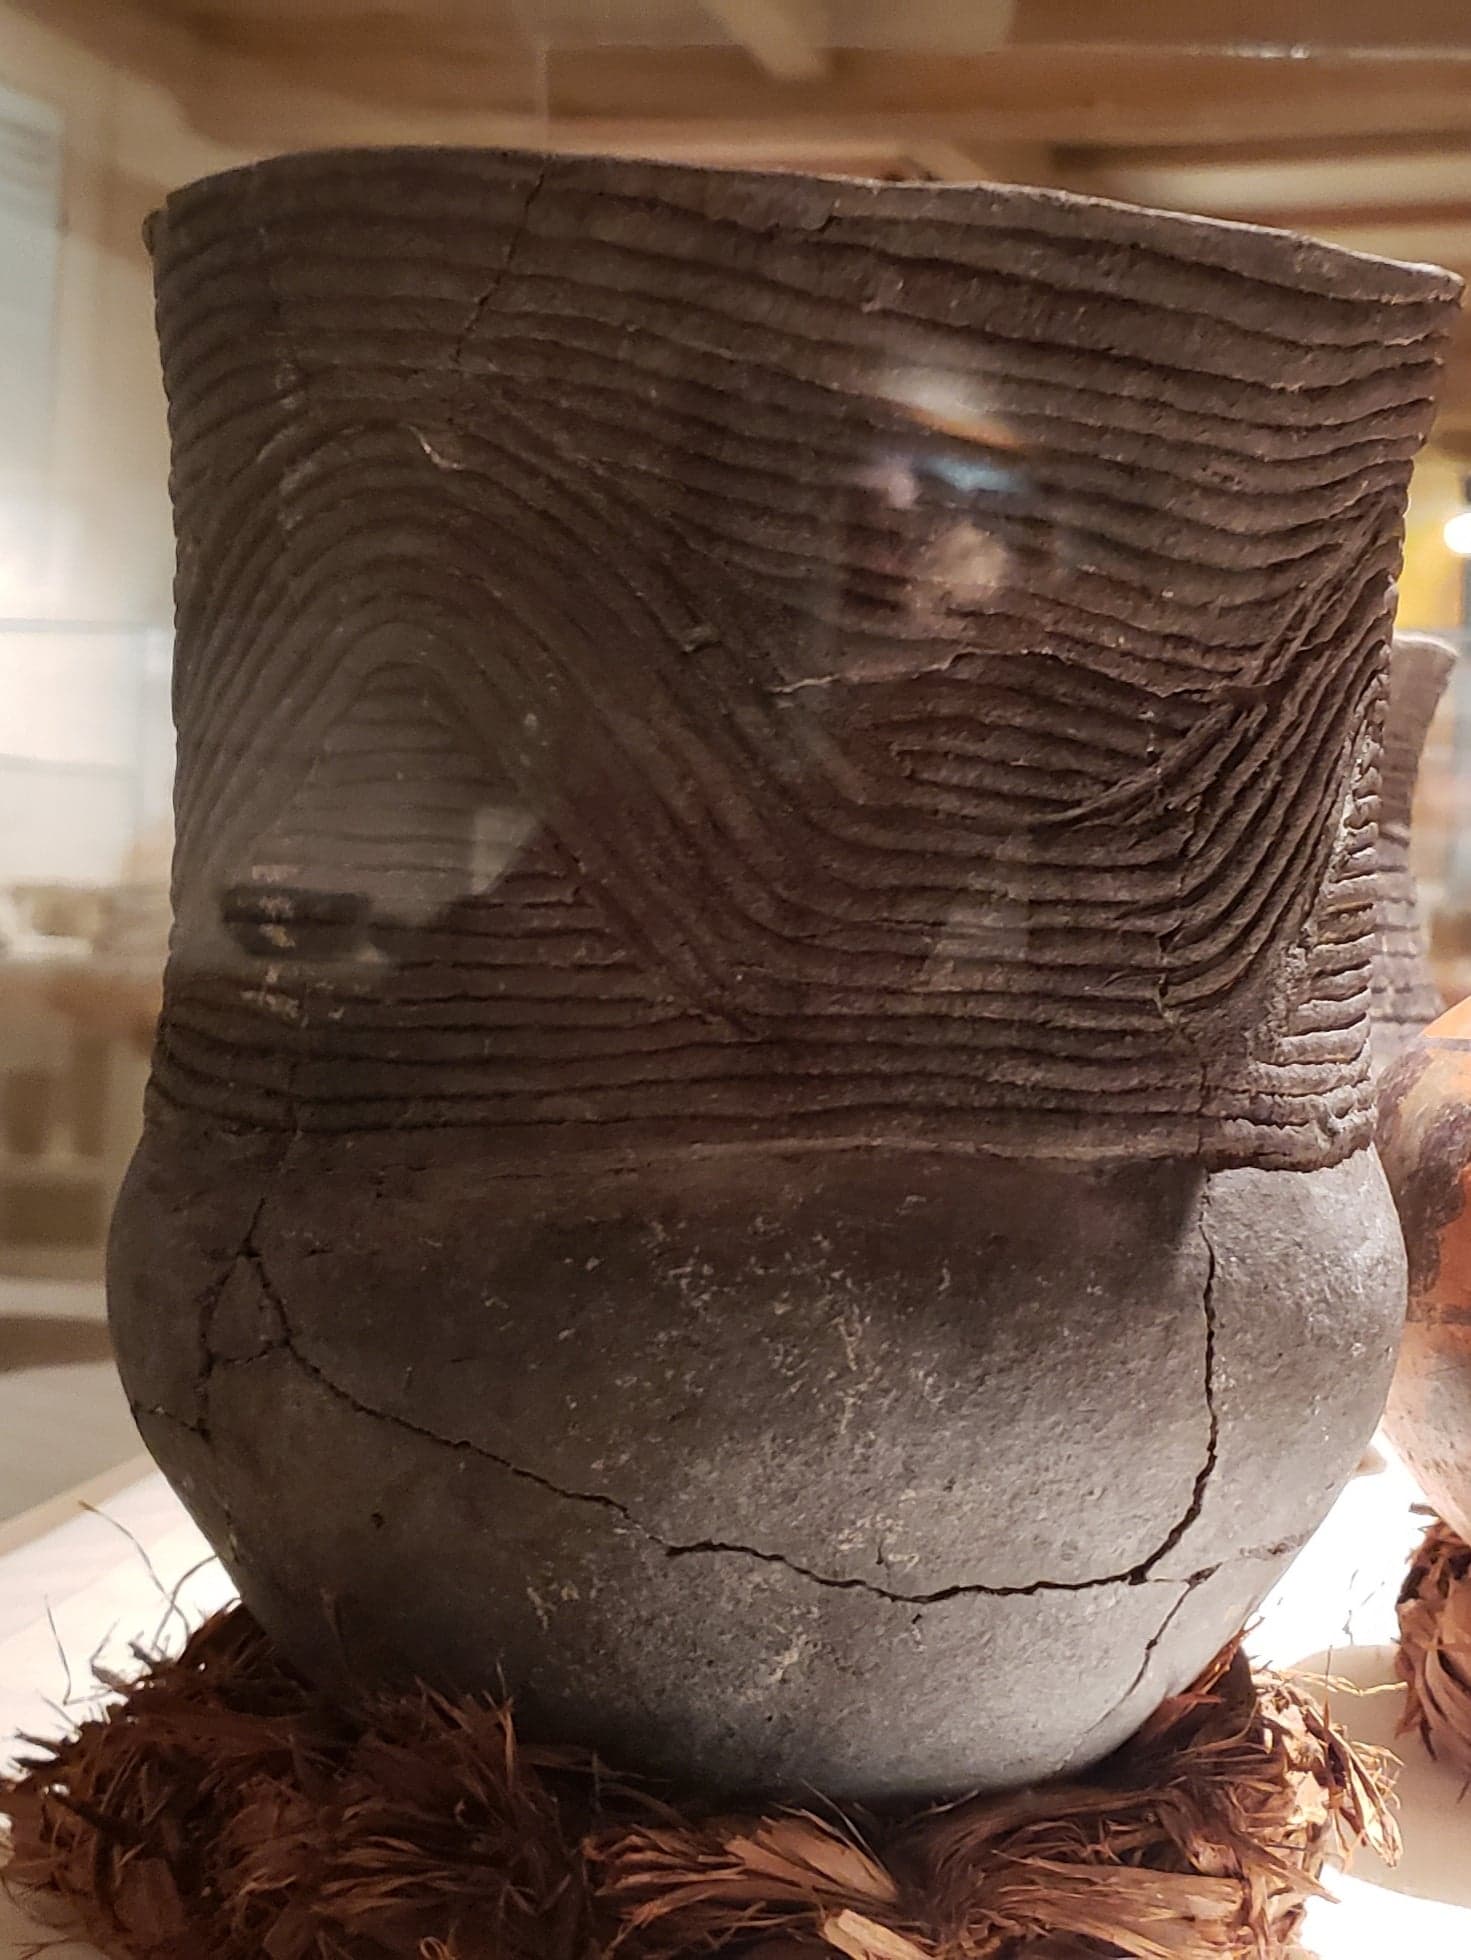 into the clay coils as the vessel is made. Neckbanded pottery has the coils near the neck overlapping so it makes the jar look like it is wearing bands around it. Lastly, plain pottery is just that plain and smooth all over. white ware has at least a slip, polish, or paint and sometimes just two or all three. The paint on the white ware potter can be used to determine where and when it was made/painted. White ware pottery can be jars, mugs, bowls, or ladles. All-day on July 29th I worked with a group of two other lab program members and various other lab staff. Throughout the day the lab program members were able to ask questions about anything and everything when a new subject was introduced to ensure we understood the material being taught.
The first part of the day on July 30th was spent at the Haynie excavation site, which is 15 minutes away from Crow Canyon. There are two great houses at the Haynie site, the East Greathouse is partially intact and the West Greathouse is almost completely destroyed after the property owner tore it down with a bulldozer to make room for his house. There are also two trenches, east and west trenches that were dug and have uncovered a pithouse and kiva. Much of the artifacts uncovered at Haynie are very confusing due to PII artifacts being found in an area thought to be associated with Basketmakers and other areas having both PI, PII, and PIII artifacts being found all in the same strat level. A very likely reason for the variety of artifacts in the same area could be done to different home improvement projects the mix up the ground. When returning to the lab, separating, analyzing, and recording different bags filled with artifacts found in the Haynie site were completed. The other lab program members and I were able to touch and feel each of the artifacts so we could identify what it was and if we didn’t know the lab workers would help us work through it. There were many times that if one of the lab workers didn’t know what the artifact was for sure they would ask other workers to validate what they thought it was. The team starting with separating the pottery, chipped stones, and ornaments (a non-utilitarian object used for decoration). Once we did that we went to the chip stones and went through them to see if we could find any projectile points and we actually found a piece of a fossilized seashell. We weighed the different groups of artifacts, entered them into the Crow Canyon data-based and put the groups of artifacts into bags with labels. Each of us lab program members was able to put in some of the artifacts into the database and it has made me realize why the lab workers only enter artifacts into the database for a few hours a day ac couple of times a week because it gets a little mind-numbing. 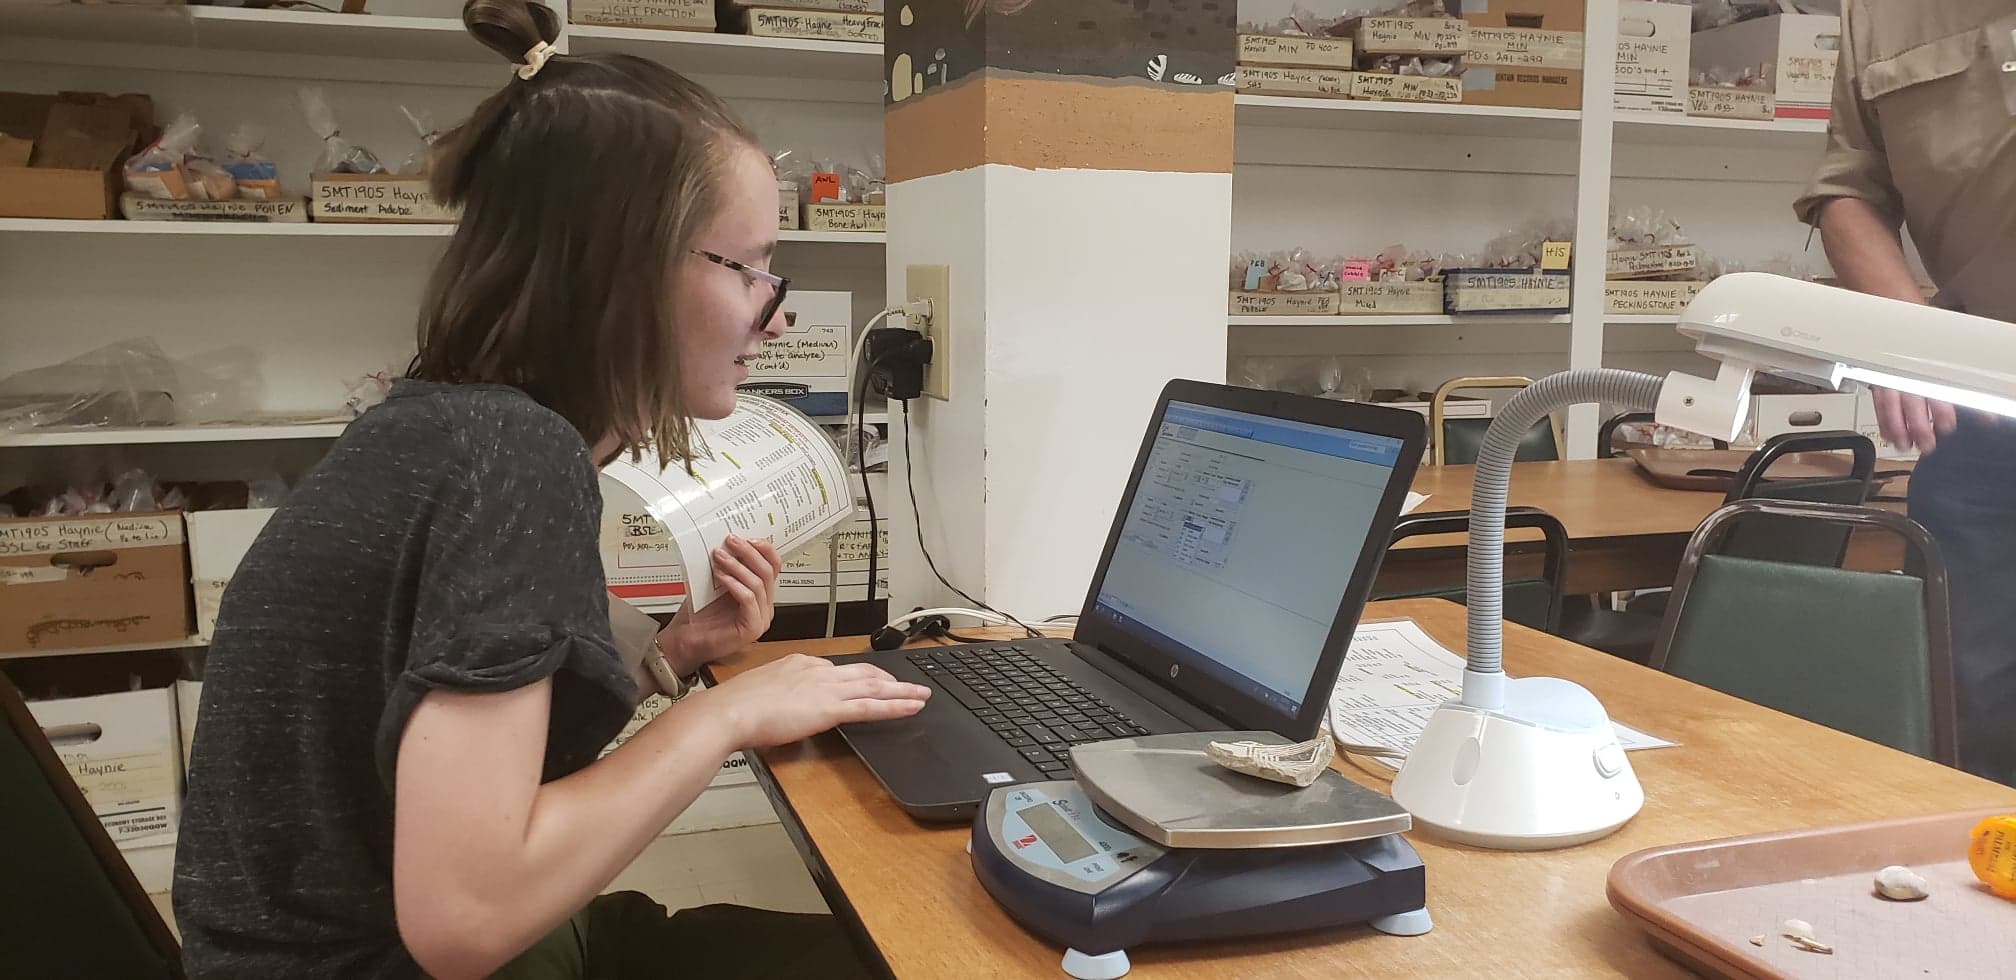
July 31st, was a full-day field trip to the Edge of Cedars Museum in Blanding Utah. While there we saw full vessels of pottery which was helpful for me because before this I had only seen sherds of pottery now when I see a sherd of the pottery I would have a stock image in my mind of what it may look like.
August 1st began in the Crow Canyon curation Room to look at complete or partially complete pottery pieces. Even though Crow Canyon has a Curation Room they don’t curate any artifacts long term and the pieces that are in the curation room are on loan from a museum. After the curation room, we went back to the lab and started deeper analyzing the bags of pottery sherds we from July 30’s Haynie dig. We separated the grey ware and white ware and separated the gray ware into corrugated, neckbanded, and smooth. To determine the specific types of pottery a flow chart was used courtesy of the lab workers (pictured to the right). The smooth ones mean it is Chapin Gray. From there we looked at the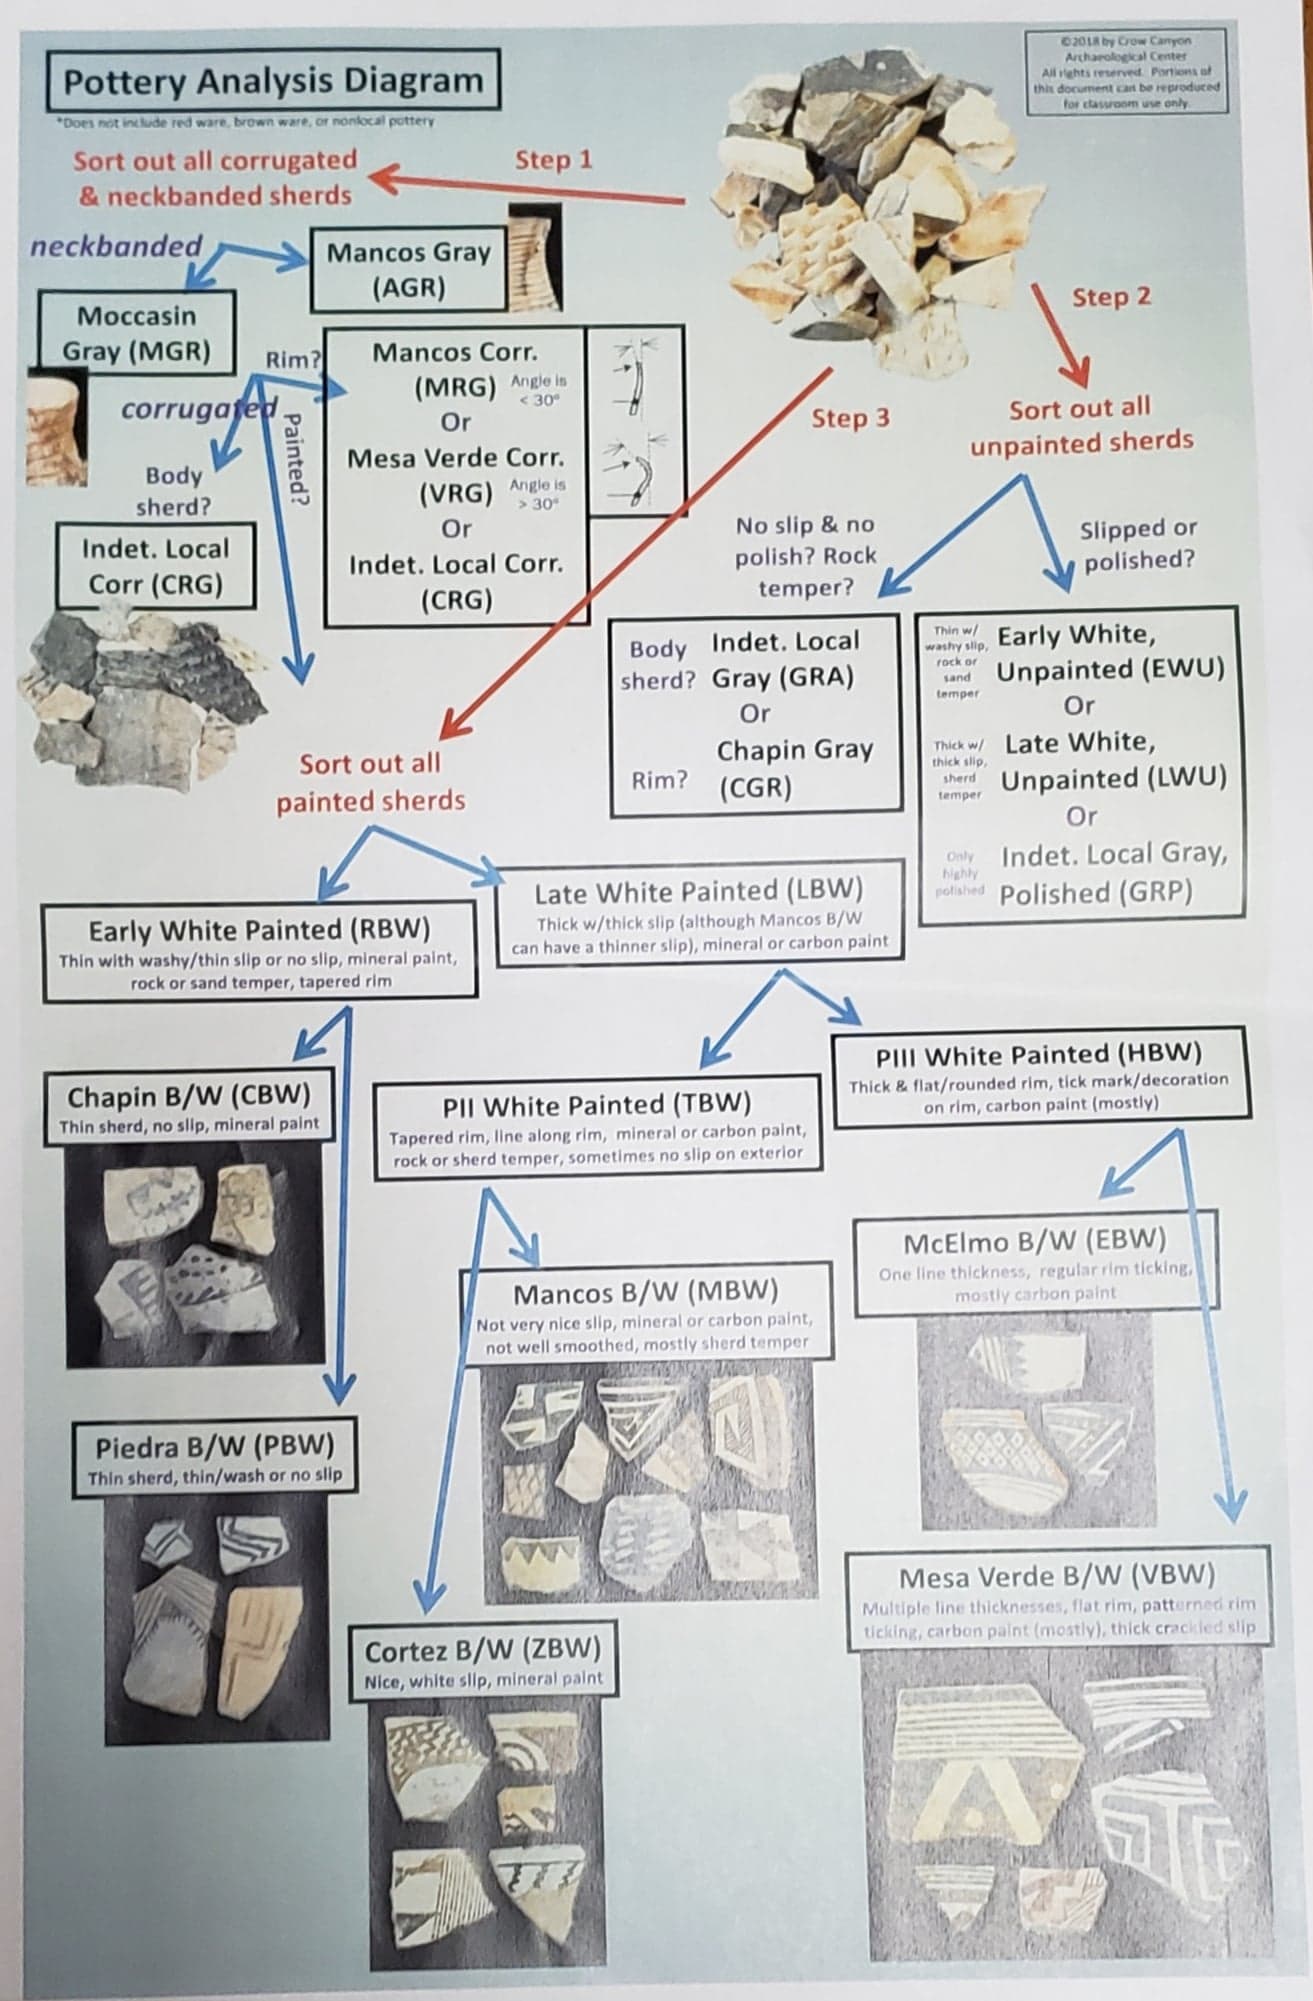 necks of the neckbanded pottery and if the neckband coils were large and flat that means it was Moccasin Neckbanded and if the neckband coils were small and pocked out they were Mancos Neckbanded. Then analyzing the corrugated gray ware if they were neckpieces seen were straight, it meant it was a Mancos Corrugated but if the neck is curved it is Mesa Verde Corrugated. If the sherd was not a neck we would call it indeterminate corrugated. We then analyzed the white ware. We looked at the pottery and if the pottery was thin and had little to no slip or if the paint was matt (meaning it is mineral) it was Early White Painted (RBW) which means it is PI and it could either be Chapin B/W or Piedra B/W. If the sherd was thick with thick slip and mineral (matt) or carbon (shiny) paint it meant it was Late White Paint (LBW). From there if the paint was mineral or carbon and you could see the sherd temper then it meant the pottery is PII White Painted and could be Mancos B/W with a not nice slip and had a “messy” paint job or Cortex B/W with a nice, white slip and mineral paint. If the Late White Painted pottery had a thick and flat/round rim, thick mark/decoration on the rim, and carbon paint then it was PIII White Painted. From there if the pottery had one line thickness of the lines of paint then it was McElmo B/W but if the pottery had many different thicknesses of lines painted then it is Mesa Verde B/W. Finally, if the pottery was made of red clay then it would be called red ware pottery and was a sign of trade due to red were being from outside of Southwest Colorado meaning it was from PI or PIII due to PI not being involved in trade. If we couldn’t determine if the pottery was a specific type of design then we would call it Early White Paint or Late White Paint. We then put all similar style of pottery in a bag with a label. After lunch, we started separated the different types of chipped stone into the material from which the stones were made. With most of the stone, the color or the feeling could tell you what it was. Some types of stone we analyzed was Morrison Mudstone (local), Morrison Silicified Sandstone (local), and Morrison Chert (local), Burro Canyon Chert (semi-local), Dakota/Burro Canyon Silicified Sandstone (local), Dakota/Burro Canyon Chert (local), Slate/Shale (local), Agate (semi-local), Igneous (semi-local), Petrified Wood (semi-local), Cheese and Raisins (non-local), Red Jasper (non-local), and Turquoise (non-local). Then if the rock was from somewhere not in Southwest Colorado it meant the stone was not local and shows signs of trade. Then we went deeper into the analysis of the chip stone and determined if any of the stones were modified and if so they would be put in a new bag by itself and with its own label. All the stones made from the same material were bagged together and shared one label. August 1st was probably my favorite day because I was able to work with other members of the lab program and lab workers to gain information on what styles of pottery were and by the end of it, I was able to more or less know what pottery style was with very little help.
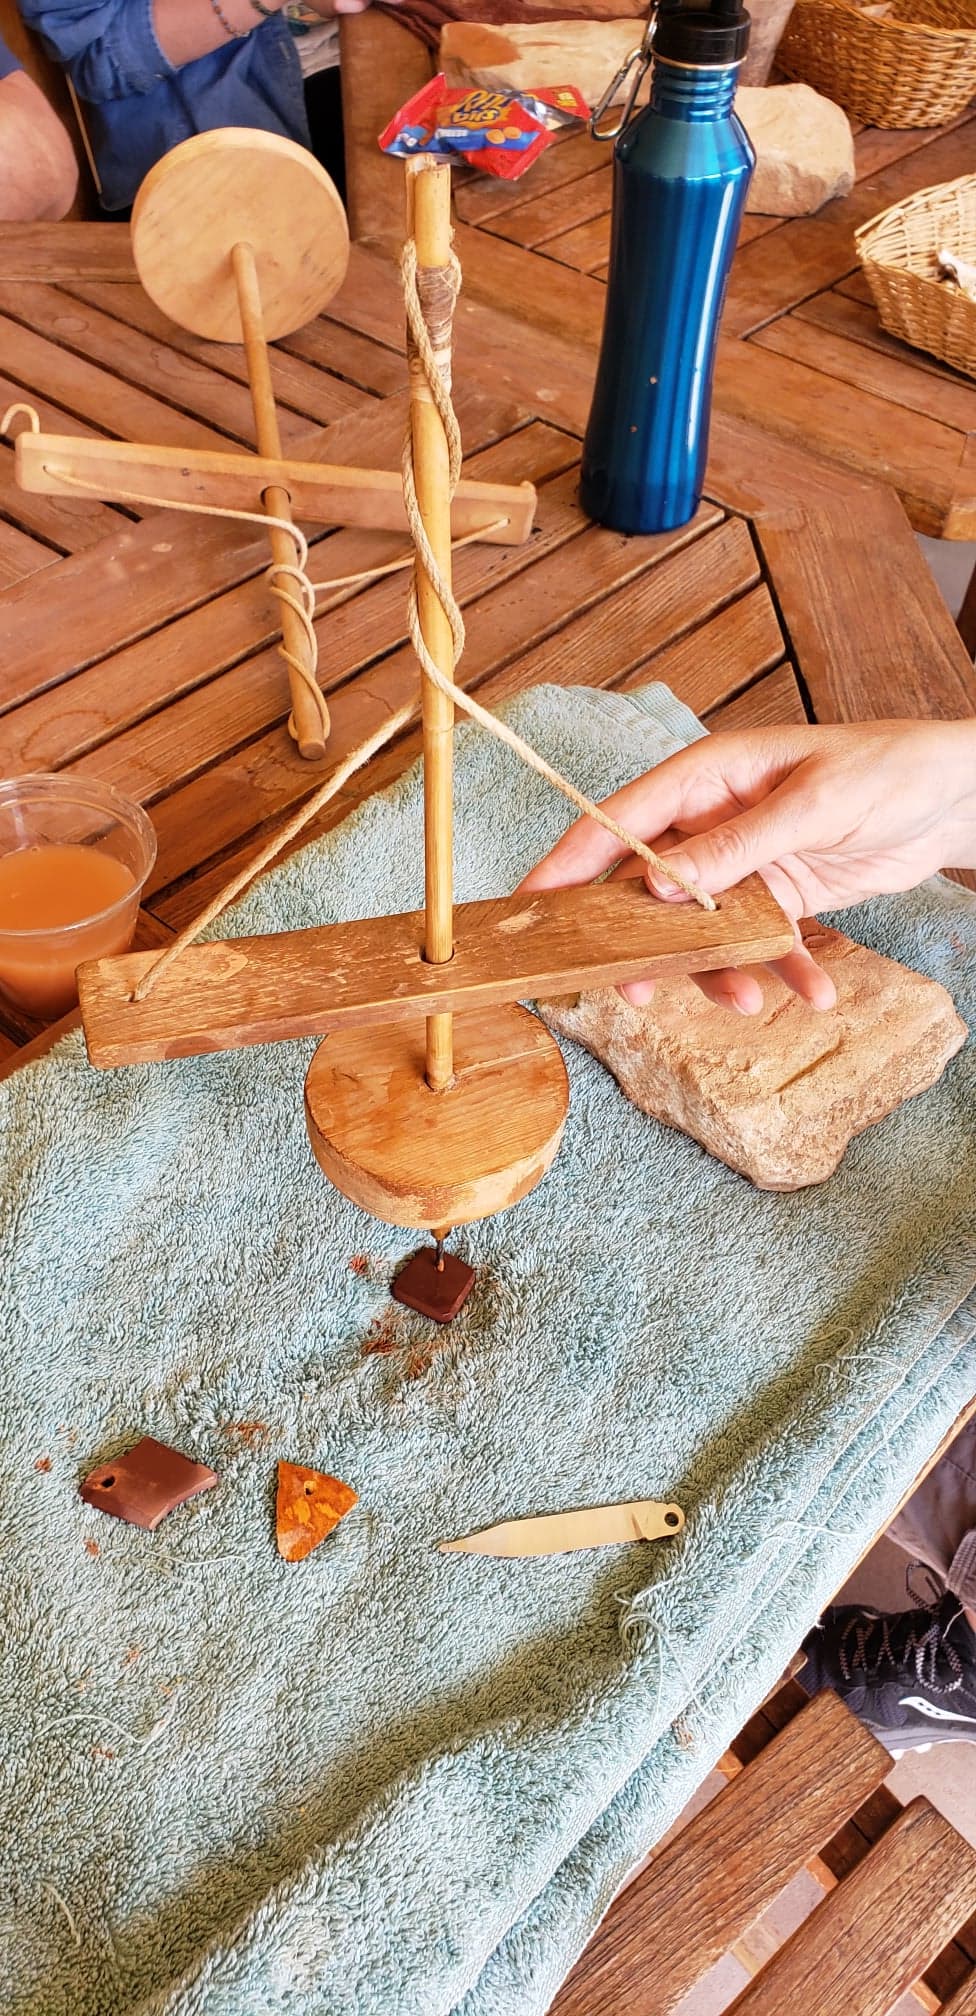
On August 2nd we spent the first half of our day analyzing different ornaments. The ornaments were made from many different materials like bone, shell, stone, pottery, etc. The ornaments were used as pendants and game pieces. Some of the game pieces were very intricate with lines engraved into the bone. Interestingly enough some of the jewelry was created by simply drilling in a whole in a sherd of pottery. 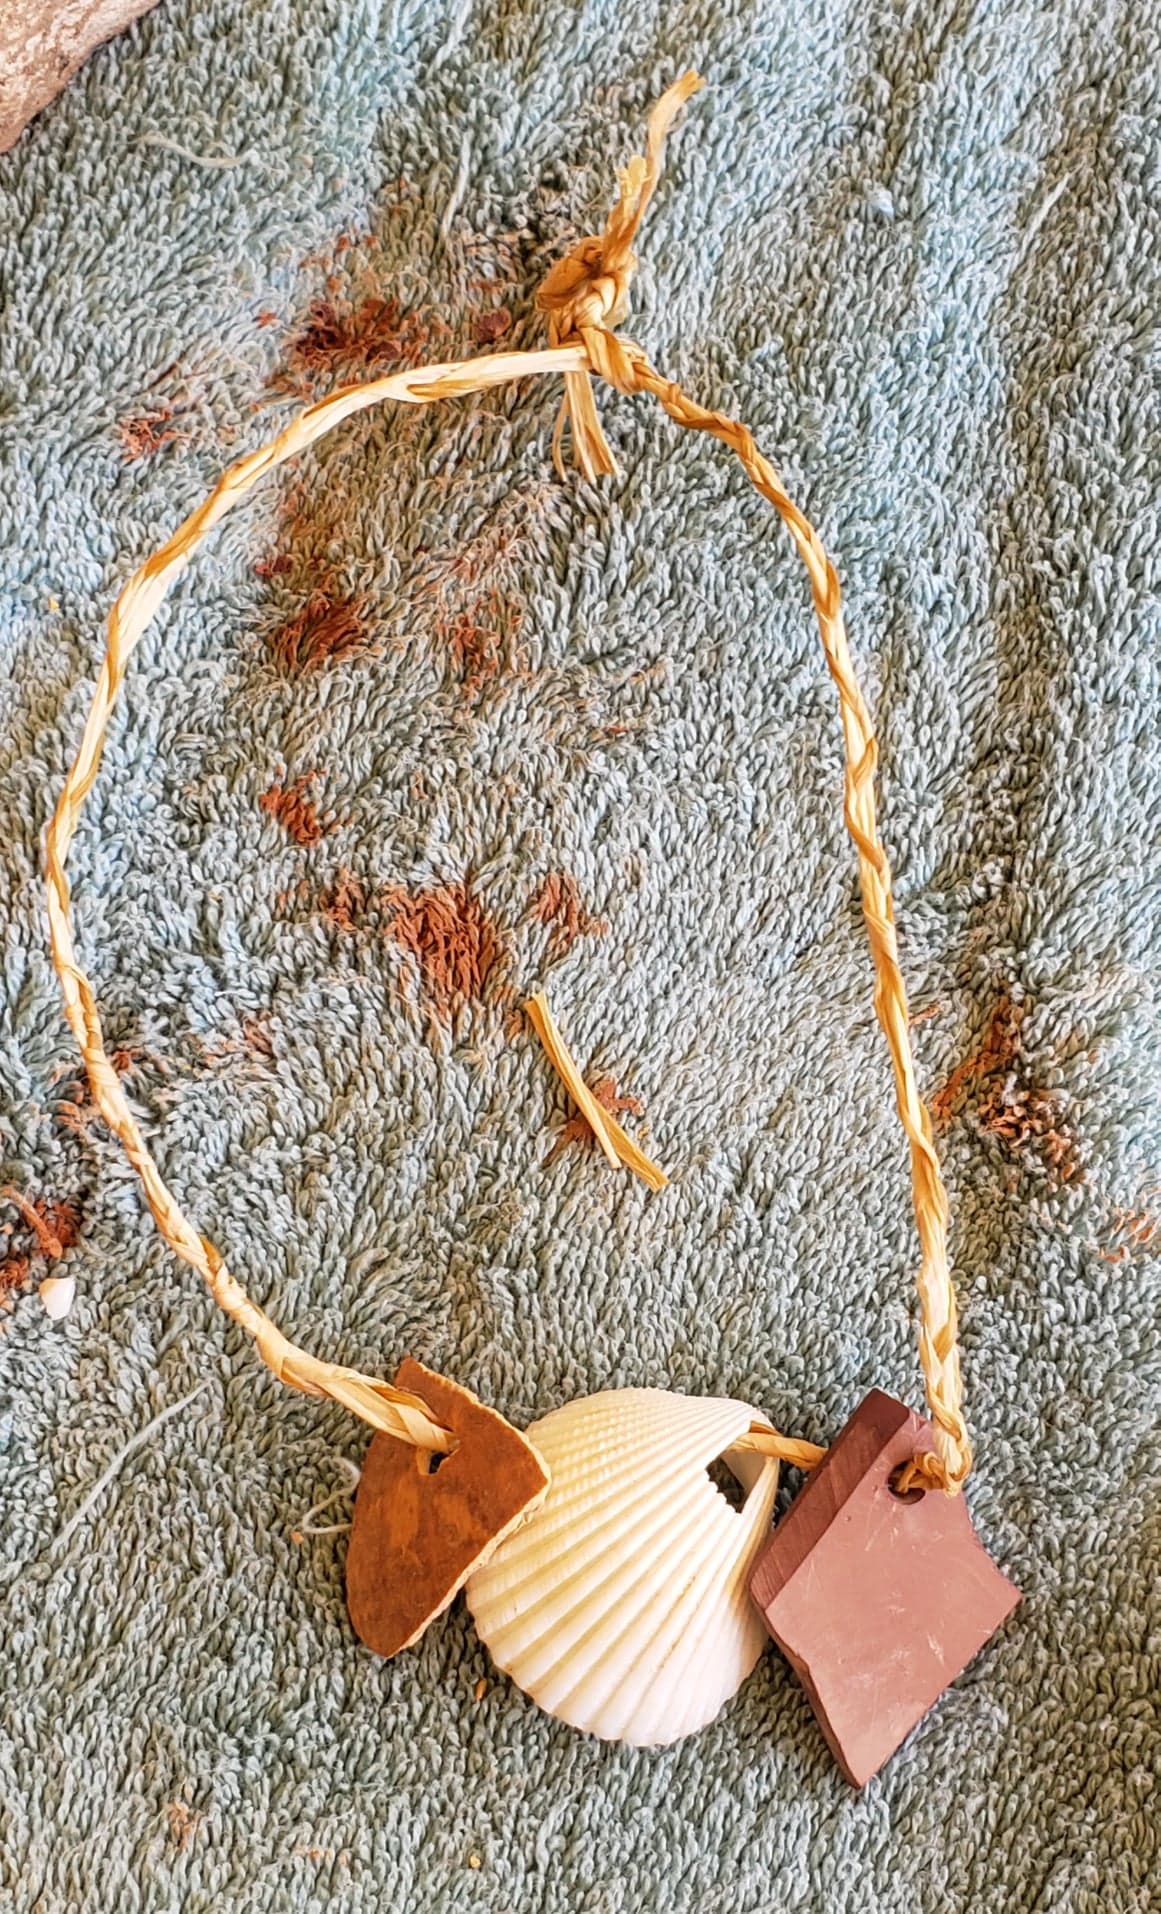 Then we went outside and made our own ornaments (mine is pictured to the left). Drilling holes into the pottery and seashells with a hand drill (pictured to the right) was a lot more difficult and time-consuming than I thought. After lunch, we started analyzing projectile points. If the projectile point was in the shape of a right triangle and size had small sharp pieces taken from the side it was most likely a knife. The projectile points
 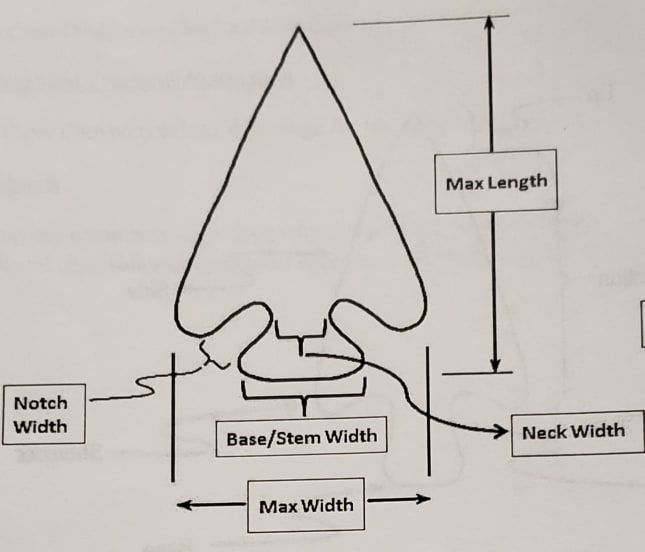 neck width was smaller than 6mm then it was an arrowhead and if the neck width was between 6mm to 10mm it was an atlatl dart or spearhead. We also dated the arrowheads, darts, and spearheads by looking at the type of notches it has. The notches are the part of the projectile point that was taken out of it so someone would wrap a string to so they could connect it to the dart, arrow, or atlatl. If the projectile point had side notches and its stem went out or was expanding it meant it is Archaic or PI and if the projectile point had corner notches then it was most likely PI or PII. To help the user with determining the exact type of projectile point, we were given a chart (pictured below). August 2nd was the day with the least bit of collaboration between the lab program members due to use analyzing the artifacts on our own, but I still did collaborate with the lab workers quite often.
 ![]()
The only things I did on August 3rd was I had breakfast with the other lab program members and drive home.
My time at crow canyon was quite amazing due to me being able to learn about the history of the Ancestral Puebloans, experience a lab setting where I got to touch and examine real artifacts, meeting new people from all walks of life, professions, and level of experience with Native American history. Lastly, I’m able to carry this program and all the experiences with me as a decide on an education and career path in the future.
There are no comments published yet.